opengl05纹理
纹理
纹理是一种可以用来为三维物体添加细节的图片。纹理可以让物体看起来更真实,而不需要为每个顶点指定额外的颜色。
纹理坐标是纹理中的一个点的位置。纹理坐标的范围是从 0 到 1,其中 0 表示纹理的左下角,1 表示纹理的右上角。
为了将纹理映射到三维物体上,我们需要为每个顶点指定一个纹理坐标。纹理坐标告诉渲染器从纹理中采样哪个点的颜色。
例如,如果我们有一个三角形,左下角的顶点纹理坐标为 (0, 0),右下角的顶点纹理坐标为 (1, 0),上部的顶点纹理坐标为 (0.5, 1.0)。那么,渲染器将从纹理的左下角采样左下角顶点的颜色,从纹理的右下角采样右下角顶点的颜色,从纹理的中间上部采样上部的顶点的颜色。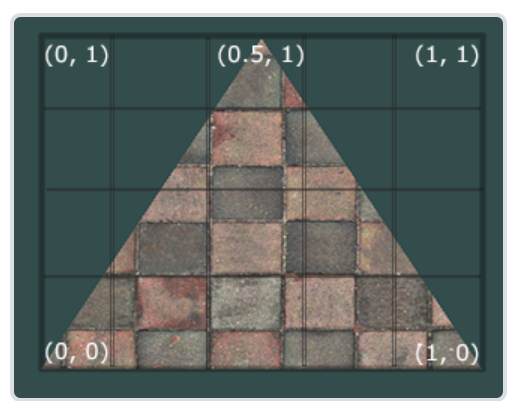
纹理采样可以采用不同的插值方式。最常见的插值方式是线性插值,它会根据纹理坐标的值来计算采样点的颜色。
例如,如果纹理坐标为 (0.5, 0.5),那么线性插值将计算左下角和右上角两个点的颜色的平均值作为采样点的颜色。
我们可以使用 OpenGL 来指定纹理采样的插值方式。
1 | float texCoords[] = { |
纹理环绕方式
纹理坐标通常是从 (0, 0) 到 (1, 1) 之间的浮点数。如果纹理坐标超出这个范围,OpenGL 会根据纹理环绕方式 (wrapping mode) 来处理。
GL_REPEAT:重复纹理图像。
GL_MIRRORED_REPEAT:重复纹理图像,每次重复时镜像放置。
GL_CLAMP_TO_EDGE:纹理坐标会被约束在 0 到 1 之间,超出的部分会重复纹理坐标的边缘。
GL_CLAMP_TO_BORDER:超出的坐标为用户指定的边缘颜色。

要设置纹理环绕方式,可以使用 glTexParameteri() 函数。例如,以下代码将纹理环绕方式设置为 GL_MIRRORED_REPEAT:
1 | glTexParameteri(GL_TEXTURE_2D, GL_TEXTURE_WRAP_S, GL_MIRRORED_REPEAT); |
第一个参数指定了纹理目标;我们使用的是2D纹理,因此纹理目标是GL_TEXTURE_2D。第二个参数需要我们指定设置的选项与应用的纹理轴。我们打算配置的是WRAP选项,并且指定S和T轴。最后一个参数需要我们传递一个环绕方式(Wrapping)
如果选择 GL_CLAMP_TO_BORDER 纹理环绕方式,还需要指定边缘颜色。可以使用 glTexParameterfv() 函数来指定边缘颜色。例如,以下代码将边缘颜色设置为红色:
1 | float borderColor[] = { 1.0f, 1.0f, 0.0f, 1.0f }; |
纹理过滤
纹理坐标不依赖于分辨率,它可以是任意浮点值。所以 OpenGL 需要知道如何将纹理像素映射到纹理坐标。当你有一个很大的物体但是纹理的分辨率很低的时候这就变得很重要了。
OpenGL也有对于纹理过滤(Texture Filtering)的选项,讨论最重要的两种:GL_NEAREST和GL_LINEAR。
- GL_NEAREST(也叫邻近过滤):选择中心点最接近纹理坐标的那个像素。
- GL_LINEAR(也叫线性过滤):基于纹理坐标附近的纹理像素,计算出一个插值,近似出这些纹理像素之间的颜色。
当进行放大(Magnify)和缩小(Minify)操作的时候可以设置纹理过滤的选项,比如你可以在纹理被缩小的时候使用邻近过滤,被放大时使用线性过滤。我们需要使用glTexParameter*函数为放大和缩小指定过滤方式。这段代码看起来会和纹理环绕方式的设置很相似:
1 | glTexParameteri(GL_TEXTURE_2D, GL_TEXTURE_MIN_FILTER, GL_NEAREST); |
多级渐远纹理
要使用多级渐远纹理,需要使用 glGenerateMipmaps() 函数。该函数会自动为纹理创建一系列多级渐远纹理。
在渲染中,可以使用 glTexParameteri() 函数来指定纹理过滤方式。当纹理被缩小时,可以使用 GL_LINEAR_MIPMAP_LINEAR 选项来获得更平滑的效果。
在渲染中,当纹理与观察者的距离超过一定的阈值时,OpenGL 会使用更低分辨率的多级渐远纹理。但是,在两个不同级别的多级渐远纹理之间会产生不真实的生硬边界。
GL_NEAREST_MIPMAP_NEAREST:使用最邻近的多级渐远纹理来匹配像素大小,并使用邻近插值进行纹理采样。
GL_LINEAR_MIPMAP_NEAREST:使用最邻近的多级渐远纹理级别,并使用线性插值进行纹理采样。
GL_NEAREST_MIPMAP_LINEAR:在两个最匹配像素大小的多级渐远纹理之间进行线性插值,使用邻近插值进行采样。
GL_LINEAR_MIPMAP_LINEAR:在两个邻近的多级渐远纹理之间使用线性插值,并使用线性插值进行采样。
要使用多级渐远纹理过滤,需要使用 glTexParameteri() 函数来指定纹理过滤方式。例如,以下代码将使用 GL_LINEAR_MIPMAP_LINEAR 过滤方式:
1 | glTexParameteri(GL_TEXTURE_2D, GL_TEXTURE_MIN_FILTER, GL_LINEAR_MIPMAP_LINEAR); |
注意: 将放大过滤的选项设置为多级渐远纹理过滤选项之一是无效的。因为多级渐远纹理主要是使用在纹理被缩小的情况下的。
加载与创建纹理
使用图形加载库加载我们的纹理图片:
这里使用LWJGL加载图片
生成纹理
在 OpenGL 中,纹理是使用 ID 引用的。纹理可以使用 glGenTextures() 函数创建,并使用 glBindTexture() 函数绑定。
要将纹理图像加载到纹理中,可以使用 glTexImage2D() 函数。该函数需要以下参数:
- 纹理目标 (Target):指定纹理在哪个目标上。通常使用 GL_TEXTURE_2D 表示 2D 纹理。
- 多级渐远纹理级别 (Level):指定纹理的级别。0 表示基本级别。
- 纹理格式 (Internal Format):指定纹理使用的格式。
- 纹理宽度 (Width):纹理的宽度。
- 纹理高度 (Height):纹理的高度。
- 边缘像素值 (Border):在纹理边缘填充的像素值。通常使用 0。
- 图像格式 (Format):图像的格式。
- 图像数据类型 (Type):图像的数据类型。
- 图像数据:纹理图像的数据。
要生成多级渐远纹理,可以使用 glGenerateMipmap() 函数。该函数会自动生成纹理的所有多级渐远纹理。
要释放纹理图像的内存,可以使用 stbi_image_free() 函数。
生成一个纹理的过程应该看起来像这样:
1 | unsigned int texture; |
应用纹理
在本部分中,我们将使用 glDrawElements 绘制 “你好,三角形” 教程最后一部分的矩形。我们需要告诉 OpenGL 如何采样纹理,所以我们必须使用纹理坐标更新顶点数据。
1 | float vertices[] = { |
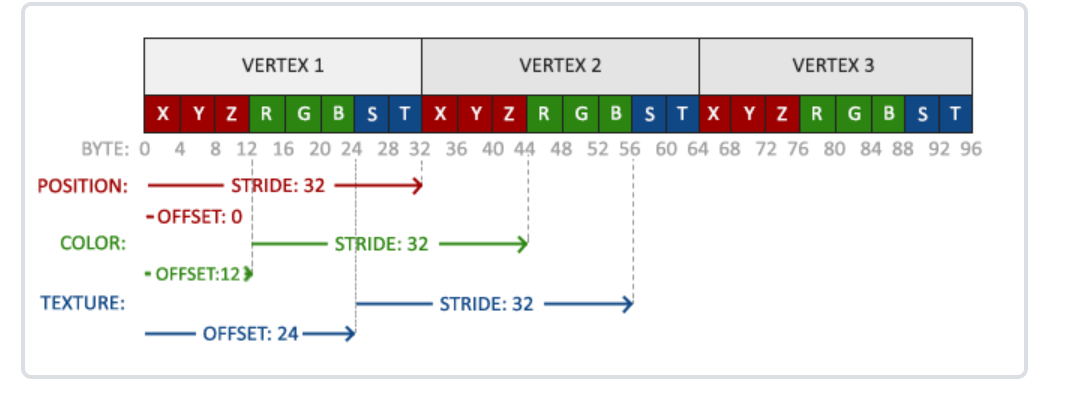
新的定点格式
1 | glVertexAttribPointer(2, 2, GL_FLOAT, GL_FALSE, 8 * sizeof(float), (void*)(6 * sizeof(float))); |
顶点着色器
1 |
|
片段着色器
1 |
|
绑定贴图,绑定VAO。
1 | glBindTexture(GL_TEXTURE_2D, texture); |
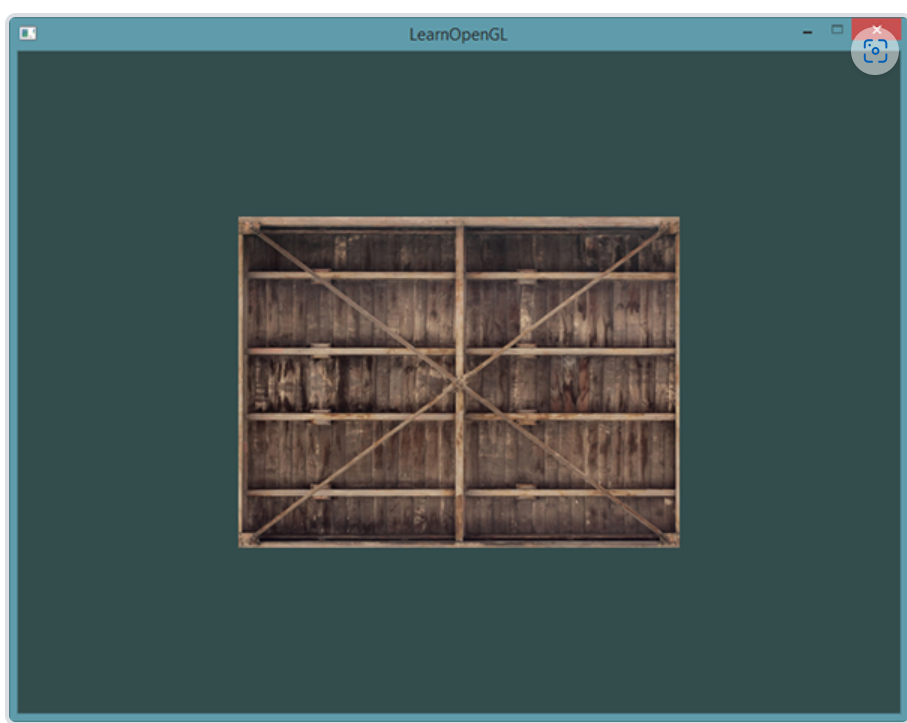
如果你跟着这个教程正确地做完了,你会看到下面的图像:
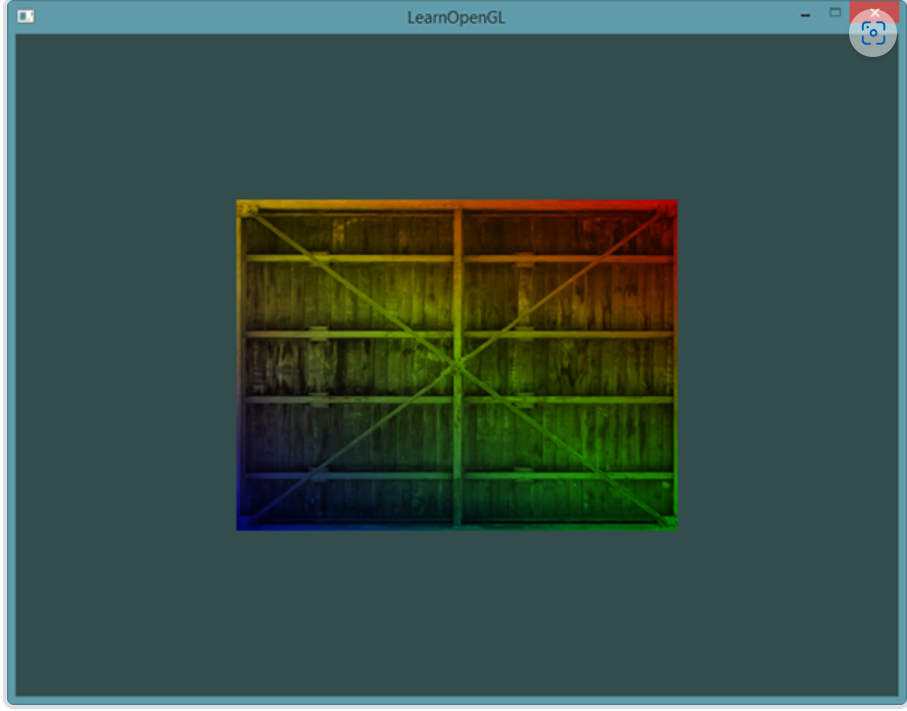
我们还可以把得到的纹理颜色与顶点颜色混合,来获得更有趣的效果。我们只需把纹理颜色与顶点颜色在片段着色器中相乘来混合二者的颜色:
1 | FragColor = texture(ourTexture, TexCoord) * vec4(ourColor, 1.0); |
最终的效果应该是顶点颜色和纹理颜色的混合色:
Java 代码在这里
1 | package org.example; |
reader
1 | package org.example; |
纹理单元
- 纹理单元和采样器:
sampler2D变量作为uniform在片段着色器中使用。不需要使用glUniform为其赋值,而是使用glUniform1i来分配纹理采样器的位置值,称为纹理单元(Texture Unit)。
- 激活和绑定纹理单元:
- 通过
glActiveTexture激活纹理单元,glBindTexture将纹理绑定到当前激活的纹理单元。GL_TEXTURE0是默认激活的纹理单元。
- 通过
- 多个纹理的使用:
- 可以使用多个纹理单元,通过
glActiveTexture和glBindTexture绑定不同的纹理到不同的纹理单元。
- 可以使用多个纹理单元,通过
- 在着色器中使用多个纹理:
- 在片段着色器中使用多个纹理采样器,并通过
mix函数对多个纹理进行混合。
- 在片段着色器中使用多个纹理采样器,并通过
- 加载和使用多个纹理:
- 加载和创建多个纹理对象,并在渲染流程中绑定它们到对应的纹理单元,然后定义哪个uniform采样器对应哪个纹理单元。
- 解决纹理上下颠倒的问题:
- 提到了加载图像时,有时纹理的Y轴方向会与OpenGL要求的不一致,可以使用
stbi_set_flip_vertically_on_load(true)来解决这个问题。
- 提到了加载图像时,有时纹理的Y轴方向会与OpenGL要求的不一致,可以使用
- 设置uniform变量和渲染循环:
- 使用
glUniform1i设置采样器对应的纹理单元,确保每个uniform采样器都对应着正确的纹理单元。
- 使用
这里我们使用了一个新的图形处理库来解决问题翻转的问题imagej
1 | implementation group: 'net.imagej', name: 'ij', version: '1.54g' |
以下是代码
图片读入类
1 | package org.example; |
Main类
1 | package org.example; |
片段着色器
1 |
|
练习
- 修改片段着色器,仅让笑脸图案朝另一个方向看,参考解答
- 尝试用不同的纹理环绕方式,设定一个从
0.0f到2.0f范围内的(而不是原来的0.0f到1.0f)纹理坐标。试试看能不能在箱子的角落放置4个笑脸:参考解答,结果。记得一定要试试其它的环绕方式。 - 尝试在矩形上只显示纹理图像的中间一部分,修改纹理坐标,达到能看见单个的像素的效果。尝试使用GL_NEAREST的纹理过滤方式让像素显示得更清晰:参考解答
- 使用一个uniform变量作为mix函数的第三个参数来改变两个纹理可见度,使用上和下键来改变箱子或笑脸的可见度:参考解答。
1 见作者答案
2见作者答案
3见作者答案
4
1 | package org.example; |
glsl
1 |
|
参考文献
[纹理 - LearnOpenGL CN (learnopengl-cn.github.io)](https://learnopengl-cn.github.io/01 Getting started/06 Textures/#_3)